Home / Patterns / Granny Square
Classic Granny Square
Cozy since the 1970s and still everywhere for good reason. Eight comprehensive steps across three rounds, and it scales to a blanket if you never want to stop.
What you'll need
- Worsted weight yarn — 1 main color, up to 2 accent colors
- 4.5–5.0mm (US 7/8) crochet hook
- Yarn needle, for weaving in ends
- Scissors
Abbreviations used
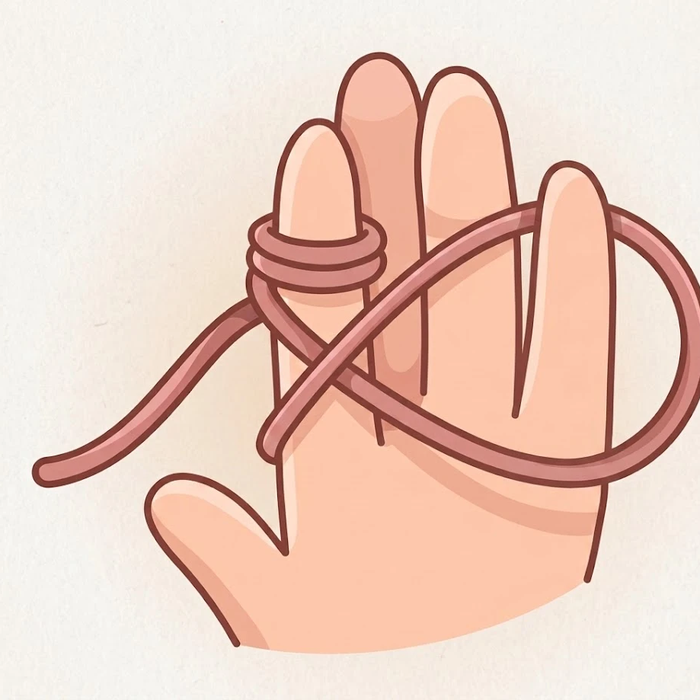
Make a magic ring
Wrap the working yarn around two fingers to form an adjustable loop, tail crossing over the working strand. This ring is the center of your square.

Round 1 — build the first two corners
Chain 3 (this counts as your first double crochet), then work 2 more double crochet into the ring. Chain 2. Work another group of 3 double crochet into the ring, then chain 2 again. You now have 2 of the 4 corner groups started.
2 of 4 cornersRound 1 — complete all four corners
Repeat “3 double crochet into the ring, chain 2” two more times, so you end with 4 groups of 3 double crochet separated by four chain-2 corner spaces. Join with a slip stitch to the top of your beginning chain-3.
4 cornersFasten off and join your second color
Fasten off the first color, leaving a tail to weave in later. Join your second color of yarn into any chain-2 corner space from Round 1, ready to start building outward.
Round 2 — work the first corners
Chain 3, then work 2 double crochet, chain 2, 3 double crochet all into that same corner space — that is one full corner. Chain 1, then repeat the same corner group into the next corner space. You now have 2 of Round 2’s 4 corners done.
2 of 4 cornersRound 2 — finish the round
Chain 1, then work a corner group (3 double crochet, chain 2, 3 double crochet) into each of the remaining two corner spaces, chaining 1 between them. Join with a slip stitch to the top of the beginning chain-3. Fasten off if you are changing color again.
square shape visibleRound 3 — add corners and sides
Join your third color into a corner space. Work a corner group (3 dc, ch 2, 3 dc), chain 1, then work a straight group of 3 double crochet into the next chain-1 side space before the next corner. Repeat all the way around — one side group added along each edge, in addition to the four corners.
1 side group per edgeFinish, or keep growing
Join with a slip stitch, fasten off, and weave in every end with a yarn needle. For a bigger square, repeat Round 3’s logic on each new round: same 4 corners, with one extra 3-double-crochet side group added per edge every time.
Tip Changing color at the start of every round (instead of continuing the same yarn) is what gives a traditional granny square its classic ringed look. Nine squares joined 3×3 makes a simple baby blanket.
Everything else worth knowing about granny squares
The granny square is less a single pattern than a whole crochet tradition — here's the context, the math, and the joining methods for turning one square into a full crochet blanket.
Why the granny square is a crochet icon
The name is generally tied to the pattern's reputation as a thrifty, stash-busting project — a way of using up small leftover amounts of yarn in different colors, a habit strongly associated with older generations getting every last bit of use from their yarn. The motif itself is much older, but "granny square" projects had a huge wave of popularity in the 1960s–70s, which is why the classic multi-color ringed look still reads as instantly retro and cozy today.
How many squares do you need?
Once you can make one square, a full crochet blanket is just repetition and joining. Here's a rough guide based on a worsted-weight square worked to about 4 inches across:
| Project | Approx. finished size | Squares needed |
|---|---|---|
| Single square | 4″ × 4″ | 1 (coaster or appliqué) |
| Baby blanket | ∼36″ × 36″ | ∼64 squares (8×8 grid) |
| Throw blanket | ∼50″ × 60″ | ∼130–150 squares |
| Bed / queen blanket | ∼90″ × 90″+ | ∼350+ squares |
These counts assume roughly 4-inch squares after blocking — your exact number will vary with yarn weight, hook size, and how many rounds you work per square.
How to join your granny squares
When you're ready to turn a pile of squares into a crochet blanket, there are three common ways to join them:
Whip stitch
Sew squares together edge to edge with a yarn needle, working through the outer loops. Simple, flat, and beginner-friendly.
Slip stitch join
Use your crochet hook to slip stitch squares together instead of a needle. Faster than sewing, with a visible ridge seam.
Join-as-you-go
Join each square to its neighbors during the final round, so there's no separate seaming step once all squares are made.
Frequently asked questions
Why is it called a "granny square"?
The name comes from the pattern's reputation as a thrifty, scrap-yarn project — traditionally associated with using up small leftover amounts of yarn in different colors. The style had a major wave of popularity in the 1960s and 70s, which is why the classic ringed, multi-color look still reads as retro today.
How much yarn do I need for one square?
A worsted-weight square worked to three rounds (about 4 inches) typically uses somewhere around 8–10 grams of yarn total across your colors — small enough that a single skein can make many squares, which is part of why it's the classic stash-buster pattern.
Why does my square curl instead of lying flat?
Curling almost always means your tension is too tight, especially on Round 1 — the center is pulling in more than the outer rounds can spread out to match. Try loosening your tension slightly, or block the finished square with steam and pins to flatten it.
What's the difference between a granny square and a "solid" granny square?
A solid granny square fills in the gaps between corner clusters, working double crochet into every stitch instead of leaving chain-1 spaces along each side. That gives a denser, warmer, gap-free fabric, compared to the open, lacy look of a traditional granny square.
Can I skip joining and just make one giant square instead?
Yes — simply keep repeating Round 3's logic on every new round (join, work the four corners, add one more side group per edge) instead of starting new squares. Many crocheters still prefer joining smaller squares though, since a single giant square uses a lot of one color at a time and is a much less portable project to carry around.